Thursday, August 21, 2008

Front Fender Fun

After sorting through my bins of random spare front fenders I've pulled off parts bikes, I came across a scabbed up unit off a 1965 Suzuki K11. It has the same full fendered lines of the original C110 fender - which didn't come with the bike - and the same basic proportions. After a bit of measuring, and test fitting, it looked like it would be a good match up.

I only had to drill two new holes for it to mount to the front fork tubes, and shorten the little rear stays that support the back of the fender. It will obviously need a bit of body work, as it was rather dented and skinned up, but I like the overall look of it.


Suzuki K11 front fender mounted up easily, allowing for full suspension travel with no rubbing.


Easily mounts to upper front shock bolts


Should help keep the salt spray down


Chris H.

Monday, August 18, 2008

Making a Seat and Gas Tank Extender

One of the keys to building this bike was to keep it somewhat "period correct" with regards to modifications. I was hoping to build it like it would be built back in the 60s. One of the main items I knew that would need to be built or modified would be the gas tank and seat. The seat would obviously need to be made to accommodate my skinny butt when tucked down in my Bonneville speed demon posture. That means there is a huge gap between the seat and tank.

Option 1 is to buy a reproduction tank like on all the vintage road race bikes. Something like the tank on a CR110 Honda immediately comes to mind. Besides the fact a reproduction tank like that costs more than the entire bike did, I didn't entirely like the look of it. Well, I loved the look of the long skinny tank, but it just didn't fit in with the hot rod theme I was going for. Besides, the stock tank was decent, as were the chrome panels and rubber knee pads. Option 2 is to build a tank extension. Basically, a fake extension that would fill up the gap, but also be strong enough to support me laying my belly and chest on it, and support the grip from my knees as I squeeze down on it when tucked.

I decided to go with option 2.

Having made a similar rear seat section for the Bridgestone 90 Racer project, I had an idea of the generic size and proportions.

Photo of the Bridgestone rear seat section for reference:


I started off with a cardboard template, to get an idea how big the final product would need to be. I then got to cutting and grinding and drilling and welding, and made up a very simple frame that mounts to the bike using the rear gas tank hold down bolt, and the upper rear shocks mounts for support. It is basically a 1" angle iron craddle that the tank extension/seat will then bolt to, and then be able to be removed as one piece.

With dimensions in hand, I visited the local craft store for some crafters foam. These foam blocks are available in various sizes, and as it turns out these little brick shaped pieces matched up with the width and height I was looking for.

Using a scrap piece of wood, I glued and screwed the foam blocks to each other, then to the wood in a rough shape. I then proceeded to carve and sand the foam into the shape I was looking for. It had a little bit of taper from bottom to top, and I made the rear portion of the seat have the usual cafe' racer bubble shape.

Foam bricks carved and sanded to shape:


After the foam mold was shaped to satisfaction, I got out the fiberglass and resin. I precut about 4 layers worth of cloth, using both 8 oz bi-directional weave and some thicker chop mat for added thickness. It was a fairly warm day, so I had to mix the resin in smaller batches and work quick. I wouldn't say it was the best job I've ever done, but I knew it would require a lot of finish work anyways to make it smooth and pretty.

After it setup, i popped the mold off the wood, and removed the bottom layer of foam bricks. This was the underside of the part, which would get mounted to the angle iron base. I then added a few more layers of fiberglass to essentially create a honeycomb of fiberglass and foam. The main section of the tank extension, and the rear tail bubble are completly filled with foam, and surrounded by fiberglass. the result is a very strong and stable part that can support some weight.

I then trimmed the part using some basic angle grinders and thick sheet metal sheers. I gave the bottom edge a little shape to match up with the rubber knee pad on the stock gas tank, while keeping the bottom edge just tall enough to completely hide the angle iron frame work underneath. After a bit of final grinding and fitting, I mounted the seat to the frame work, and then mounted it to the bike.

Raw fiberglass part on bike for test fitting


I let the part setup for a couple weeks before I started to do some finish body work to it. Using some good 'ol fashion body filler, I was able to clean up the surface. Luckily I still had my body filler scrapers in the toolbox, since the easiest time to do rough finishing on filler is right after it starts to setup, as it can be scraped off like a cheese grater, in little shavings.

Filler is a pain in the butt to sand, so anything to minimize sanding is worth it


It still needs some finish work in a few sections, but you can see the overall look of the tank extension and seat as it is mounted on the bike. I cut out a piece of 1/2" thick foam rubber for the cushion, which will just be spray glued down to the seat pan, with four small holes to access the bolts that secure the seat to the frame work underneath.


Here is a shot with the intrepid rider on board showing off his not-so-legal slippers and boxer shorts:


I'm still contemplating the next project, but I'm thinking it might be a small front fender to help keep the salt spray off the engine, bike, and rider.

Chris H.

Sunday, August 17, 2008

Fun with Scales

In preparation for the engine build, I picked up a US Balance Magnum 1000XR digital scale, so I could weigh all the little parts and have a baseline. The scale has a max capacity of 1,000 grams, with 0.1g precision.


After cleaning up all the parts, I weighed everything in the top end of the motor.

Engine Parts weight (grams)


Piston 80.1
Piston pin 20.9
rocker arm shaft 12.8
small rocker arm 28
big rocker arm 34.7
rocker arm shaft spring 1
top piston ring 2.6
middle piston ring 2.6
bottom piston ring 3.1
short pushrod 15
long pushrod 15.7
intake valve 15.8
exhaust valve 17.9
inner valve spring 6.3
outer valve spring 15.8
keepers (pair) 0.8
retainer 4.7


I intend to build up a couple different engines for this project. I figure one will be a mild hot rod setup, with some basic lightening of components, increased compressions, bigger carb etc. Then a high test hot rod motor to eeck out that last 0.5 to 1hp.

Chris H.

Footpegs, Brake Lever, and Rear Shocks

With the front handlebars in place, I was able to stretch out on the bike and get an idea of where I wanted to mount the rear foot pegs and rear brake lever. I figured fitting my lanky 6-foot tall frame on this bike could be a challenge, so I wanted to see how uncomfortable I would be using the stock passenger foot peg locations. As it turned out, it felt great. It gave me a good tuck, just enough clearance between my legs for the tank extension, and my feet/ankles didn't feel too cramped up.

Getting an idea where to mount the rear footpegs.


With the footpeg location selected, I then turned my attention to the rear brake lever. I had given thought to using a cable, but decided that an easier solution would be to simply modify the stock brake pullrod, and of course make a new lever. As it turns out, there is a boss mounted to the backside of the swingarm that locates the front of the rear brake/hub stay. So I got crafty and built a new lever

Simple lever cut from single sheet to minimize joints. 1/4" rod was welded to backside of plate to add stiffness. Entire lever pivots on the swingarm boss, pulling the shortened brake pullrod in a forward motion, just like stock.


As mounted on the bike, mostly hidden behind the swingarm.


I then scrounged through the spare parts bins and found a set of matching footpegs off a C100 that threaded right into the stock swingarm posts. The toe kicker for the brake lever is a passenger footpeg off another parts bike.


Brake lever, footpegs and toe kicker fitted.


Lastly, I decided to work up a set of rear shocks, as I was tired of having to carry the back of the bike around when I wanted to move it in the garage. I had taken dimensions of the little front shocks used in the leading link setup, and decided to see if could be used on the rear. The benfits would include having the same shocks on all "four corners" and since it is a nice little coilover setup, I could change spring rates or heights to best suit the bike.

Set of stock C110/100 front leading link shocks used in the rear. Like the front setup, I have about 1-inch of bum travel with my weight on the bike, with lots of adjustability should I want to change it.


Chris H.

Handlebars

After I got the ride height about where I wanted it, I then started working on the handlebars. As a reminder, here are the rules specific to handlebar location for the class:

...
2.G. HAND/ FOOT CONTROLS
Hand controls (clutch and brake) must have a minimum 1/2” ball
on the end. Flattening of the ball end is acceptable, however all
edges must be rounded. All control ends must be an integral part of the lever. Foot operated controls must pivot independently. Foot throttle
must have toe clip with return throttle. All controls are subject to
scrutinizing. Riders in the riding position must have 10” between
thumbs. All handlebars must extend outside the fork tubes at a
minimum of 6” (streamliners excluded). Riders may be asked to
demonstrate their ability to navigate with the current controls.
Stops to steering must limit riders hands from touching the fairing
or tank at full right or left turns. A hydraulic dampener cannot act
as a fork stop.

and from the Modifed Frame opening paragraph

The lowest part of seat and handlebar grips must not exceed
an imaginary line drawn between the tops of the rims.
...


So, the bars have to extend at least 6-inches wider than the fork tubes, and there must be 10-inches between the thumbs when gripping the controls. And the position of the hands have to be higher than the top of wheel rim when viewed from side.

I quickly realized that I wanted to mount the bar much lower and farther ahead than could be accomplished using the stock handlebar clamps, to allow a much more stretched out seating position. As it happens there are several bolt locations on the front forks that would be suitable for mounting a plate too, which could then have a set of standard fork clamps. This was my solution:


Steel plate cut out to fit into the open space between the front fork tubes, bolted solid with 5 bolts. The handlebar clamps came off a Honda S90 parts bike, as did the 7/8" diameter handlebar.


I cut about 4-inches out of the center of the bar, then cut about 4-inches off each end. I'm left with roughly 11-inches between thumbs, while the bar extends a tad more than 7-inches past the fork tubes. And yes, there is clearance between the top of the tire and the steel plate at full compression of the front suspension.


Next up will be foot pegs and rear brake lever.

Chris H.

Saturday, August 16, 2008

Mock-Up Begins

After a weekend of cleaning, sanding, blasting, and priming, I decided to start the mock-up process for the bike. I set the frame up on a small stand, then fit the front and rear suspensions. My first task was to try and determine the ride height of the bike with me on it. My goal is to get it as low as possible to help minimize the frontal area, while still retaining enough room for my lanky features.

The first step was to take apart the front leading link suspension, and see if can be easily lowered. As luck would have it, yes it can. The small coilover shock setup inside the front forks uses a short coil spring mounted above a spacer roughly 2 inches tall. Simply taking out the spacer, or shortening it, will allow the leading link to move upward with weight on the bike. After a bit of measuring, I decided to trim the spacers in half. This lowers the front end about 2 inches total (based on the motion ratio of the leading link pivot) while still giving about 1 inch of bump travel.

For the rear, I initially threw on the hub/wheel setup with a spare 3x17 knobby tire than came off a spare bike in the parts collection. I wanted to check the clearance in the rear fender, since I assume I'll be running a bigger than stock rear tire to help gear the bike up.

Bike at its first mock-up stance


I even sat on the gloves to play Ricky Racer while the neighbors watched


My next project is to figure out where to mount the handlebars based on the very specific rules for the class.

Chris H.

Engine Details and Teardown

A few Friday nights, I got the bug and decided to disassemble the top end of the motor. I have been curious as to the construction of the top end, and in fact, wanted to take some measurements and weights of the various pieces. Here are a few photos I snapped as the top end came apart, then a few details of the individual items.

Rocker box bolts and valve clearance caps removed.


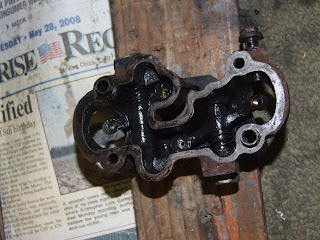
Rocker box removed, looking at the top of the cylinder head.


Inside of rocker box, showing tiny rocker arms.


Cylinder head removed. Note the three O-Rings, two are 10.5mm and one is 7.5mm in diameter according to the manual.


Bottom of cylinder head. Note recesses for the O-Rings, and the copper head gasket tucked down inside the combustion chamber bowl. This aluminum head has considerably more fin area than the cast iron head from the C100.


Cylinder barrel removed, showing the piston hanging on the rod.


Bottom side of cylinder barrel.


Yes...that's a quarter sitting at the bottom of the photo, below the piston. Piston pin to its right, and the two massive pushrods on the far right.

More Photo Details

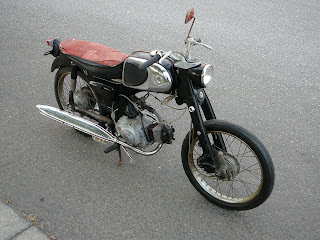
I thought I would throw up a few more photos of the C110, in the as purchased state.

Side View of the engine. Note the aluminum head of the C110, and side draft carb, which differs from the C100's cast iron head and down draft carb.


Close up showing the rocker box assembly. Note the oil feed lines.


Close up of the HUGE 16mm carburetor.


Front hub detail. Note the leading link front fork arrangement, just like the C100.


Rear hub/sprocket setup. This bike came with an aftermarket aluminum sprocket, in the stock 40T size.

Friday, August 15, 2008

Them's the Rules

Like any good builder, I sat down and read the rules. Twice. Then I re-read them and made notes on the items that I thought needed a bit of emphasis in the grey matter. In fact, I even setup a spiral notebook with a page (or two) dedicated to several key areas of the build. Knowing I would be a rookie, I didn’t want to make too many rookie mistakes. I figure if I attempt to follow the letter of the rule, I’ll have less grief. Yes, following the letter can be slower than following the “intent” and running into some grey areas, but again, I’m not wanting to get yelled at by the chief Tech Inspector. I’m hoping to use this notebook as a source for drawings during the build, and will ultimately send a packet of information off to the Chief Tech Inspector to get “buy off” of the many little items that need to get built.

Some of the parts I’ll be building, and rules I’ll be building too are listed below. It isn’t a complete list of rules, more just a sample of the specific parameters I need to keep in mind when construction begins. So in no particular order, and cut and pasted from the AMA Supplemental Regulations, for the BUB Motorcycle Speed Trials:

2.D. FUEL SHUTOFF AND ENGINE KILL SWITCH
Motorcycles must be equipped with a positive ignition off switch
to terminate engine power. The riders must be able to use the
switch without their hands leaving the handlebars.
Gasoline class motorcycles must have a fuel shut off, activated
from the riders position.

Meaning: I need ignition and fuel shutoff switches…

2.G. HAND/ FOOT CONTROLS
Hand controls (clutch and brake) must have a minimum 1/2” ball
on the end. Flattening of the ball end is acceptable, however all
edges must be rounded. All control ends must be an integral part of
the lever. Foot operated controls must pivot independently. Foot throttle
must have toe clip with return throttle. All controls are subject to
scrutinizing. Riders in the riding position must have 10” between
thumbs. All handlebars must extend outside the fork tubes at a
minimum of 6” (streamliners excluded). Riders may be asked to
demonstrate their ability to navigate with the current controls.
Stops to steering must limit riders hands from touching the fairing
or tank at full right or left turns. A hydraulic dampener cannot act
as a fork stop.

Meaning: Custom handlebars may be built, but must have 10” between thumbs, and at least 6” of bar extending out past the fork tube.

2.M. SAFETY WIRING
Transmission oil drain plug, and engine oil drain plug must be
safety wired. Axle nuts must be secured with safety wire or castle
nut and cotter key. Locking compounds are prohibited.

Meaning: wire and key important bolts/nuts

2.N. STEERING DAMPER
Required in all classes.

Meaning: gotta run a steering damper!

2.Q. TIRES
It is recommended that tires are rated for the appropriate speeds
and, use is at the sole discretion of the owner/participant. The rider
has the sole responsibility of inspecting the condition of the tire
before and after each run.

Meaning: I never even thought about speed rating for tires on a 50-60mph bike, but it makes sense. I’ll have to research brands and sizes.


MODIFIED FRAME CLASS
This section is designed to advance the efficiency of motorcycles
attempting records and increase the strength and stability. Overall
construction of the modified frame must be based on the original
production design and geometry and not purpose built.
Acceptable alterations include modifications of steering head angle
and removal of miscellaneous brackets and braces.
Half of the original cross structure members must be retained from
the transmission forward to insure structural integrity. Modified
frame class may be subject to special scrutineering of structure
welds. The lowest part of seat and handlebar grips must not exceed
an imaginary line drawn between the tops of the rims.

Meaning: Modify a stock frame to go faster. I thought it was interesting the seat and handlebar rule was thrown in this general section, as it seems like it could get lost. It basically says the handlebars can’t be below the top of the front wheel rim.

5.A. AXLES AND WHEELS
The minimum, non-stock wheel replacement size is 15”. Front and
rear axle material must be of Titanium or steel alloy only.

Meaning: no super small wheels/tires to reduce drag.

5.B. BRAKES
Rear brakes (required) must be actuated from the handlebars or
foot peg position. Front brakes are not required in this class.
Hydraulic Drum/ shoe and disc brakes assemblies are acceptable.

Meaning: no front brake required, but since it specifically says “Hydraulic” how does that affect the stock mechanical rear drum?

5.E. FOOT PEGS
Foot pegs must be a minimum of 6” ahead of rear axle.

Meaning: Foot pegs can’t be located way out in Superman land. As it turns out, the passenger foot peg location is 6.5” forward of the rear axle centerline.

5.F. FRONT AND REAR FENDERS
Front and rear fenders may be removed. Generic, replacement type
fenders may be substituted. Rear fenders may not extend beyond
the centerline of the front or rear axle. Elongated seat may act as
rear fender and is subject to scrutineering.

Meaning: I can run a different front fender that isn’t as bulky. In fact, I can run without, but it’s obvious a front fender will help to reduce the amount of salt thrown on the bike. Also, if I wanted to chop the rear sheet metal fender off, I could build a new seat to act like a fender.

5.H. GASOLINE TANK
Aftermarket gas tank is permitted with a minimum capacity of 1.32
gallons, mounted in the original position.

Meaning: I had to read this twice. If I replace the stock gas tank, the aftermarket unit must be 1.32 gallon in volume. However, the stock tank is quite that size, so perhaps I’ll use the stock tank in the build…

5.J. OPEN CLASS
Open class motorcycles do not permit streamlining. Streamlining is
anything forward of the rider that has the perceptible purpose of
directing, controlling or limiting the airflow around the motorcycle
and/or rider.

Meaning: No fancy fairing, or air diverters in the open class. If I want to throw on some fairings, I can run in Partial Streamlining class.


So, as you can see, it isn’t just a matter of throwing the bike together and driving to Wendover, Utah. I want to make sure the custom bits I build follow the rules, at the same time take advantage of the speed enhancing tricks. This should be fun!

Chris H.

Craigslist Comes Through

One of the benefits of living on Northern California seems to be an extensive supply of small displacement Japanese motorcycles. In fact, all but one of my current bikes came off craigslist, and usually within a couple hours drive. Well, as chance should have it, a Honda C110 popped up locally a couple weeks after making my decision to run in Modified Frame 50cc Pushrod engine class. I contacted the owner, arranged for payment and pickup. In fact, a co-worker was heading down to the area the very next day, so he was kind enough to pick up the bike and deliver it to my door. So far this was proving pretty damn easy!

The bike was as described, which was mostly complete, rough around the edges, and full of $400 worth of charm. It also came with a box full of spare parts. The engine kicked over, and in fact had spark after I quickly swapped a spare battery in it. I didn’t attempt to start it, as I knew the gas – if there was any – was no doubt like varnish. It had some crusty bits, many of which wouldn’t be used on the final product anyways. So, my next step was to take a few dozen photos of the bike in the before state. Here are but a few to get your juices flowing:

Don't get too close:


It might bite:


49cc of Pushrod Thunder:


As you can see, this project will be as much about “restoring/rebuilding” as it will be about modifying the bike for racing. In fact, this is where I set a rather interesting ground rule for the build: I wanted to build this bike like it could have been built back in the 1960s. Meaning, I want it to have the feel of an old school hot rod bike. I’m not going to drop $600 dollars on a brand new café racer gas tank, or machine up billet rear sets, and replace every bolt and nut with titanium. In the end, I’m hoping it will look like a period built Café’ Racer Hot Rod. If this means the bike ends up 1mph slower, so be it. I can always break my rule the following year.

Chris H.

The Land Speed Bug...It Bit Me

Sometime last year, during the build of our 1964 Bridgestone 90 Racer project, I got to thinking about Bonneville, and wondered if there were classes for small displacement bikes like we tend to ride and collect. After a little searching online, I came across www.landracing.com which appears to the best source of information for land speed events. It is a great technical resource, with links to all the different LSR clubs that run throughout the country. Being new to this world, I immediately downloaded just about every rule book and record list I could find online, and of course enjoyed the countless photo albums.

It took a bit of research and note taking to make it through the various rule books and record lists, because the classification system for motorcycles uses a lot of letter and number designations. Some of which make perfect sense, others that do not. And not all the LSR Clubs and governing bodies use the same rules and class designations, so that can lead to some confusion. In fact, I'm still a little confused about how this bike will cross-over into other clubs. And that brings me to the club/organization I have decided to run with. Long story short, I have Chosen the BUB Speed Trials group for several reasons, one of which simply comes down to the fact I’m a Nervous Nelly when it comes to new events, and it appears that the motorcycle only BUB group will have an event more geared to my rookie tastes. It was also nice that they have their rules available online, and have a great group of people willing to answer questions.

Now, what about the class and bike? Well, my original intent was to look at the various 50cc engine classes and make a decision on what type of frame I wanted to build. I actually wanted to build something, as in create something, so the Production frame class was thrown out. That left me with Modified Frame and Special Construction, as I wasn’t interested in building a streamliner. I had originally intended to go Special Construction, as it gives a builder a lot of freedom to design a bike. Perhaps too much freedom for a rookie builder though. So in the back of my head I had settled on a Modified Frame class, which as the name suggests, requires the use of a stock production frame, but allows all sorts modifications to things like engine, suspension, seating position, controls etc. In fact the rules are quite a bit more open than how I’m building my bike, which will be explained later.

In terms of 50cc engines, it was obvious that most of the classes have been dominated by late model water cooled 2-strokers, like the Aprilia RS50s that currently hold half a dozen records. For a while, this put me off, because building up a bike with a modern 2-stroke engine doesn’t even remotely fit in with my hobby of restoring 1960s Japanese bikes. Until I saw the engine class specific to pushrod engines. Yes, that’s right, Land Speed Race clubs still cater to the crusty old pushrod. Having a restored Honda C100 in the collection, I immediately remembered that these early engines were pushrod operated, and that Honda even offered a hot rod version of the venerable Cub, called the C110 Sport. I didn’t have one of these in the collection, but it has been on my list for some time. So perhaps I’ve come about this all wrong, or perhaps it will work as planned, but I chose a Modified Frame 50cc Pushrod engine class simply because I’ve wanted to build a Honda C110. Genius.

As for the existing records, it appears that a C110 in fact currently holds the record in both Gas and Fuel (Alcohol) categories in the Modified Frame class. There is no record set for Modified Frame Partial Streamlining (same frame class, but you can run some limited fairing and aero work to speed things up ) so perhaps if I feel frisky I’ll enter two classes, with and without fairings.

So there you have it. I’ve chosen a Club to run with, a Class to build to, and a Bike to build. Only problem was, I didn’t have a C110. The search began…

Chris H.